Adding and returning parts on a work order
Asset Essentials allows you to associate parts to a work order. This helps track on-hand quantities of parts as they are used in your maintenance program. You can add parts to a work order from the work order form, using the Work Order Summary page, or by entering multiple parts on multiple work orders by using the WO Parts page. You can also return parts that were not used on the work order.
Watch the video tutorial:

Adding parts from the work order form
- Click on the Work Orders menu icon, then select Work Orders.
- Right-click on a work order and select Edit.
- In the Parts section, click the Add Parts button.
- In the window that displays, filter and sort the part list to find the item(s) you need to add to the work order.
- Check the box next to the item(s).
- Click Done.
- The part will be added under the Inventory Parts header in this section.
- The Quantity field will default to 1, but you can edit this by clicking on the value and changing the amount, if necessary.
- Some fields will display a pencil icon (
 ) to the right of the value. This indicates that this value can be edited by clicking into the field and changing the value.

Adding parts from the work order summary page
- Click on the Work Orders menu icon, then select Work Orders.
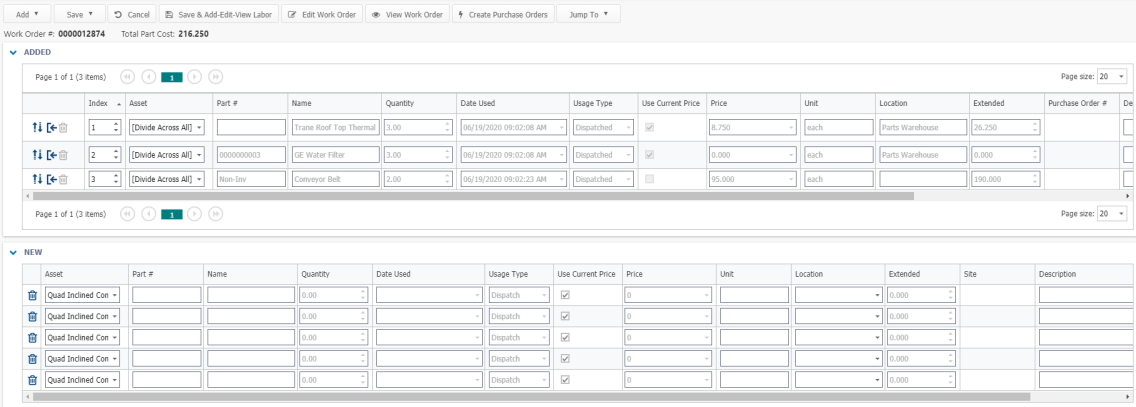
- Right-click on a Work Order record and select Edit Part Entries.
- In the New section at the bottom of the page you will see five rows to enter Parts for the Work Order.
- Click the Add button and then choose from the following options:
- Parts - This will bring up the Select Part window. Once you select a part(s), this will add a part entry in the New section with the part's information.
- All Location/Asset/Site Parts - This menu option will vary depending on the Source Type of the work order. Choosing this option will add any parts associated with the work order's Location/Asset/Site.
- All PM/PdM Parts - This will add any parts associated with the PM/PdM schedule that generated the work order.
- Quick Part Entries - This will add five additional blank part entry rows to the New section.
- Non-Inv Items - This will add five part entry rows in the New section with the Part # listed as "Non-Inv."
- Fill out the remaining fields on the part entry.
- Click Save at the top of the page. Any part entries entered in the New section will now appear in the Added section.
Adding parts from the WO parts page
- Click on the Parts & Purchase Orders menu icon and then click WO Parts.
- Click the New button.
- For each Part that is needed on a Work Order, use either the Quick Part Entries or the Non-Inv Part form to enter one line per Part. You can enter multiple Parts per Work Order, as well as enter Parts for multiple Work Orders.
Quick Part Entries
For Parts that are listed in Asset Essentials, use this form to enter the information. Asset Essentials will use Part information to help fill out the form.
- Enter the WO # as it appears on the Work Order summary page. Include any 0s at the front of the number.
- Source Type and Source will populate based on the Work Order data.
- Enter the Part #. This will automatically populate the part Name.
- Enter the Quantity needed by either typing the correct number or using the arrows in the text field.
- Select the Date Used by clicking on the drop down menu and selecting a date and time from the calendar.
- Select from the Usage Type drop down menu either Dispatch, Reserve, or Order.
- By default, Asset Essentials will assume you want to use the current price and will give the price listed in the program. If you need to use a different price, uncheck the Use Current Price box and edit the Price as needed.
- The Location drop down menu will list any Locations associated with the Part, as well as the Quantity Available and Quantity Reserved. Select a Location from the drop down menu to determine where the Part should come from.
- The Extended field will show the price as it has been calculated according to the Price and the Quantity.
- If needed, enter a Description.

Non-Inv Part
Use this form for Parts that are not listed in Asset Essentials.
- Enter the WO # as it appears on the Work Order summary page. Include any 0s at the front of the number.
- Source Type and Source will populate based on the Work Order data.
- Type the Part Name.
- Enter a Quantity, Date Used, Unit, and if needed, a Description.
- The Extended field will show the price as it has been calculated according to the Price and the Quantity.

- Click Save & Exit at the top of your screen.
Returning parts on a work order
You can set up your account to ensure that a separate transaction is made when returning parts that were not needed for the work order. This feature will prevent part transactions on a work order from being edited or deleted. *Note: A Global Administrator for your account must enable this feature in the system settings.
How to enable returning parts
*Note: Only a Global Administrator can enable this feature.
- Click on the Admin menu icon, then select Configurations.
- In the Misc section, click System Setting.
- Click Edit at the top of the page.
- Check the box next to Return only for dispatched parts in the General section.
- Click Save at the top of the page.
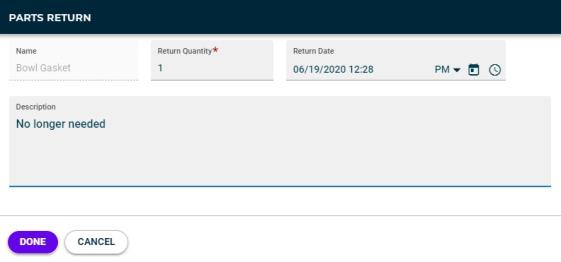
How to return a part on a work order
- From the work order, navigate to the Parts section and click the Return button in the actions column.
- Adjust the Return Quantity and Return Date, if needed.
- Enter a Description to articulate why you are returning the part.
- Click the Done button to complete the return.
- A new line item will show in the Parts section with a usage type of Returned.